menu   Home Answers Math Games Free Resources Contact Me  

Using Crossword Puzzles to Study The Christmas Story as Recorded in the Bible

$2.80
We may consider the Christmas tradition of reading the Nativity story a given, but after hearing others talk, it often gets overlooked in the hustle and bustle of opening gifts and preparing a big meal. The Christmas Story helps children discover one of the most important stories of all time. Through this story, children come to understand the events leading up to Jesus' birth and this special miracle. It introduces children to the reason why we celebrate this special day, and shares with them the wonderful gift from God. 

I am aware there are numerous Christmas activities to choose from and many times, it is difficult to separate the "secular" Christmas activities from the Biblical ones. Maybe you are wondering, "What activity can I use to tell the Christmas Story in a different way?" Try using a crossword puzzle! 

I have created two Bible crossword puzzles for Christmas that are specifically designed to review and study the birth of Christ as recorded in the Bible. Both are free form crossword puzzles that feature 25 words with Scripture references. If an answer is unknown, the Bible reference provides a way to find the answer while encouraging the use of the Bible. The words included in both puzzles are Bethlehem, Caesar Augustus, December, east, Egypt, Elizabeth, frankincense, Gabriel, glory, gold, Jesus, Joseph, King Herod, magi, manger, Mary, Merry Christmas, Messiah, myrrh, Nazareth, Quirinius, save, shepherds, star, and terrified.

One crossword includes a word bank which makes it easier to solve while the more challenging one does not. Even though the same words are used for each crossword, each grid is laid out in a different way; so, you have two distinct puzzles. Here are some ways you might use these crosswords.
  1. Pass them out while the children are waiting to open presents. It might change their focus!
  2. Include the adults in the puzzle solving by giving them the crossword without the word bank.
  3. Work with a sibling or cousin or friend to learn the characters of the Christmas story.
  4. Use the crossword with the word bank as a review; then hand out the second puzzle to solve as a way to reflect on what facts about Christmas have been learned.
  5. Offer a small prize to the teams or individuals that get all off the answers correct.
Answers keys for both puzzles are included; so, you don't have to search them out yourself.

How to Overcome Mathphobia (a hatred of Math) and Be a Success

I HATE Math!
We are almost at the end of the fall semester at the college where I teach. (I teach Mathphobics who aren't always thrilled to be in my math class.) Last week, as the students were entering and finding seats, I was greeted with, “Math is my worst enemy!” I guess this particular student was waiting for an impending Math Attack. But then I began thinking, “Should this student wait to be attacked or learn how to approach and conquer the enemy?” Since winning any battle requires forethought and planning, here is a three step battle plan for Mathphobics.
1) Determine why math is your enemy. Did you have a bad experience? Were you ever made to feel stupid, foolish, or brainless? Did your parents say they didn’t like math, and it was a family heredity issue? (One of the curious characteristics about our society is that it is now socially acceptable to take pride in hating mathematics. It’s like wearing a badge of honor or is that dishonor? Who would ever admit to not being able to read or write?) Math is an essential subject and without math, not much is possible...not even telling time!

2) Be optimistic. Suffering from pessimism when thinking of or doing math problems makes it impossible to enjoy math. Come to class ready to learn. At the end of class, write down one thing you learned or thought was fun. I realize math teachers are a big part of how a student views math. In fact, one of the most important factors in a student’s attitude toward mathematics is the teacher and the classroom environment. Just using lecture, discussion, and seat work does not create much interest in mathematics. You've been in that class. Go over the homework; do samples of the new homework; start the new homework. Hands-on activities, songs, visuals, graphic organizers, and connecting math to real life engage students, create forums for discussion, and make math meaningful and useful.

3) Prove Yourself. Take baby steps, but be consistent. Faithfully do the homework and have someone check it. Don’t miss one math class! You can’t learn if you aren't there. Join in the discussions. Think about and write down your questions and share them with your teacher or with the class. Study for an upcoming test by reviewing 15 minutes each night a week before the test. Get help through tutoring, asking your instructor, or becoming a part of a study group. Keep in mind, no one is destined for defeat!

So don’t just sit there and wait for the dreaded Math Attack. Meet it head on with a three step battle plan in hand!
-------------------------------------------------------------------------------
FREE
Math courses are not like other courses. To pass most other subjects, a student must read, understand, and recall the subject matter. However, to pass math, an extra step is required: a student must use the information they have learned to solve math problems correctly. Special math study skills are needed to help the student learn more and to get better grades. To receive 20 beneficial math study tips, just download this free resource.

You are invited to the Inlinkz link party!

Click here to enter

Elvis and PEMDAS - A New Way to Introduce the Order of Operations


Any math teacher who teaches the Order of Operations is familiar with the phrase, "Please Excuse My Dear Aunt Sally".  For the life of me, I don't know who Aunt Sally is or what she has done, but apparently we are to excuse her for the offense.  In my math classes, I use "Pale Elvis Meets Dracula After School".  Of course both of these examples are mnemonics or acronyms; so, the first letter of each word stands for something.  P = Parenthesis, E = Exponents, M = Multiplication, D = Division, A = Addition, and S = Subtraction

I have always taught the Order of Operations by just listing which procedures should be done first and in the order they were to be done.  But after viewing a different way on Pinterest, I have changed my approach. Here is a chart with the details and the steps to "success" listed on the right.


Since multiplication and division as well as addition and subtraction equally rank in order, they are written side by side. What I like about this chart is that it clearly indicates to the student what they are to do and when.  To sum it up:

When expressions have more than one operation, follow the rules for the Order of Operations:
  1. First do all operations that lie inside parentheses.
  2. Next, do any work with exponents or radicals.
  3. Working from left to right, do all the multiplication and division.
  4. Finally, working from left to right, do all the addition and subtraction.
Failure to use the Order of Operations can result in a wrong answer to a problem.  This happened to me when I taught 3rd grade.  On the Test That Counts, the following problem was given.
The correct answer is 11 because you multiply the 4 x 2 and then add the 3, but can you guess which answer most of my students chose?  That's right - 14!  From that year on, the Order of Operations became a priority in my classroom.  Is it a priority in yours?  Should it be?

-----------------------------------------------------------------------------
$3.75

I have a product in my store entitled: Order of Operations - PEMDAS, A New Approach. This ten page resource includes a lesson plan outline for introducing PEMDAS, an easy to understand chart for the students, an explanation of PEMDAS for the student as well as ten practice problems. It is aligned with the fifth grade common core standard of 5.OA.1. Just click on the words under the cover page if it is something you might like.

"BOO" to Fractions? Recognizing Equivalent Fractions, Reducing Fractions


Here is a Halloween riddle: Which building does Dracula like to visit in New York City? Give up? It's
the Vampire State Building!! (Ha! Ha!) Here is another riddle. What do ghosts eat for breakfast? Scream of Wheat and Ghost Toasties!

Okay, so what do these riddles have to do with teaching math? I have been attempting to come up with ways for my students to recognize fractional parts in lowest terms. As you know from this blog, I have used Pattern Sticks, the Divisibility Rules, and finding Digital Root. These are all strategies my students like and use, but to be a good mathematician requires practice - something most of my students dread doing. I can find many "drill and kill" activities, but they tend to do just that, drill those who don't need it and kill those who already know how to do it. So to drill and "thrill", I created fractional word puzzles for specific times of the year.

The one for October is Halloween Fraction Riddles. It contains eight riddles that the students must discover by correctly identifying fractional parts of words. For instance, my first clue might be:

The first 2/3's of WILLOW. The word WILLOW contains six letters. It takes two letters to make 1/3; therefore, the first 2/3's would be the word WILL. This causes the students to group the letters (in this case 4/6), and then to reduce the fraction to lowest terms. The letters are a visual aid for those students who are still having difficulty, and I observe many actually drawing lines between the letters to create groups of two. 

$3.00
At first, I thought my students would breeze through the activities, but to my surprise, they proved to be challenging as well as somewhat tricky - just perfect for a Trick or Treat holiday. Maybe this is an activity you would like to try with your intermediate or middle school students. Just click on this link: Halloween Fraction Riddles.

A Go Figure Debut for A Canadian who is new! Plus she teaches high school science!

Jacqueline is from Alberta, Canada and she has been teaching high school science for six years. Like so many of us, her favorite aspect of teaching is building relationships with her students. Jacqueline says her classroom always had a relaxed vibe because she always wanted her students to feel welcome and at peace. She wanted her classroom to be a place where students felt comfortable coming at lunchtime or after school or to just hangout.

Jacqueline also loves creating resources. She was always interested in graphic design growing up and loved how she could implement that into little things like making her lesson slides and notes. This year she took a break from teaching to go back to school for a one-year graphic design program. So far, she has been loving it and is looking forward to implementing her new knowledge into her future classes and lesson creations.

In her spare time, Jacqueline enjoys kayaking, playing squash, and playing board and card games. Often her family gets together and plays games together. Jacqueline has always loved the logic and strategy element of games and she thinks that is one of the reasons she was so interested in teaching science.

Jacqueline creates notes that she hopes students will find aesthetically pleasing and fun to fill out - things like having bubble letters and diagrams to color in. In addition, she has Google slides in her store that go along with the notes so teachers can project those and have students follow along. One thing that is really important to Jacqueline when teaching is making sure her students are actually understanding the information, and not just memorizing it (which she feels happens all too often in biology). She really tries to emphasize developing understanding with her notes and not merely presenting the information.

Jacqueline currently has 72 products in her store, four of which are free. Her featured FREE resource is entitled Planets of our Solar System Notes and Crossword. This nine page resource includes student notes, a teacher key, and slides for teaching. It is notes about the planets of our solar system and includes a review crossword puzzle. This resource can be used by students on Google Drive or Google Classroom. It follows the Alberta Science 9 Unit E (Space) Curriculum.

Jacqueline's' paid resource is over electricity. It is called Circuits and Schematics Notes and Practice and includes student notes, a teacher key, and slides for teaching. The notes are about how to draw circuit schematics with a practice at the end. This resource contains 19 pages.  Five are students note pages; five are key pages and nine are Google slides. It follows the Alberta Science 9 Unit D (Electricity) Curriculum.

If you teach junior high or high school science, you will discover some or many of Jacqueline's resources are a perfect supplement to what you are doing. Check out her store, and definitely download her free resource.

October - Is It "Fall" or "Autumn"? Doing Science Investigations Using Leaves


October has finally arrived.  October means football (Ohio State, of course), cooler weather, and gorgeous leaves. (It is also the month my husband and I were married.) In October, we see the leaves turning colors, and the deciduous trees shedding their leaves.

Another name for fall is autumn, a rather strange name to me. Through research, I discovered that the word autumn is from the Old French autumpne, automne, which came from the Latin autumnus. Autumn has been in general use since the 1960's and means the season that follows summer and comes before winter.
Fall is the most common usage among those in the United States; however, the word autumn is often interchanged with fall in many countries including the U.S.A. It marks the transition from summer into winter, in September if you live in the Northern Hemisphere or in March if you live in the Southern Hemisphere.  It also denotes when the days are noticeably shorter and the temperatures finally start to cool off. In North America, autumn is considered to officially start with the September equinox. This year it was on September 23rd.
With all of that said, the leaves in our neighbor's yard have already begun to fall into ours which aggravates my husband because he is the one who gets to rake them. Maybe focusing on some activities using leaves will divert his attention away from the thought of raking leaves to science investigations.  
Remember ironing leaves between wax paper?  We did that in school when I was a little girl (eons and eons ago).  Here is how to do it.
  1. Find different sizes and colors of leaves.
  2. Tear off two sheets about the same size of waxed paper.
  3. Set the iron on "dry".  No water or steam here!
  4. The heat level of the iron should be medium.
  5. Place leaves on one piece of the waxed paper.
  6. Lay the other piece on top.
  7. Iron away!
You can also use this activity to identify leaves.  According to my husband who knows trees, leaves and birds from his college studies, we "waxed" a maple leaf, sweet gum leaf, elm leaf, cottonwood leaf (the state tree of Kansas - they are everywhere), and two he doesn't recognize because they come from some unknown ornamental shrubs.

$5.30
Maybe you would like to use leaves as a science investigation in your classroom.  I have one in my Teacher Pay Teachers store that is a six lesson science performance demonstration for grades K-2. The inquiry guides the primary student through the scientific method and includes: 
  1. Exploration time
  2. Writing a good investigative question
  3. Making a prediction
  4. Designing a plan
  5. Gathering the data
  6. Writing a conclusion based on the data. 
Be"leaf" me, your students will have fun!

Terrible at Factoring Trinomials (Polynomials) in Algebra? Try This Method that NEVER Fails!

I spent the summer months tutoring a high school girl who was getting ready to take Algebra II.  She didn't do very well in Algebra I and with geometry between the two classes, she was lost. Since she is a very concrete, visual person, I knew I needed to come up with different algebraic methods so she could succeed. 

When we got to to factoring trinomials, she really needed help as most of the methods were too abstract for her. For those of you who have forgotten, a trinomial is a polynomial that has three terms. Most likely, students start learning how to factor trinomials written in the form ax2 + bx + c

There are several different methods that can be used to factor trinomials.  The first is guess and check using ac and grouping. Find two numbers that ADD up to b and MULTIPLY to get ac in ax2 + bx + c. The second approach is the box method. You write the equation in a two-by-two box. This method is more thoroughly explained on You Tube. Look up factoring trinomials using the box method.  There is also the method of slide and divide which again you can look up on You Tube to see exactly how that works. Grouping is another method. Students need to choose which method they understand and which one works best for them. With continual practice, they will get better and faster at using it.

My favorite method is the one most students understand and grasp. It builds on the ac method, but takes it takes it one step further. It made sense to my student, and she was easily factoring trinomials after only two tutoring sessions.

Because it worked so well, I developed a new math resource. It is a step-by-step guide that teaches how to factor quadratic equations in a straightforward and uncomplicated way. It includes polynomials with common monomial factors, and trinomials with and without 1 as the leading coefficient. Some answers are prime. This simple method does not treat trinomials when a =1 differently since those problems are incorporated with “when a is greater than 1” problems.

Following each explanation (five total) are a set of six practice problems that replicate the method introduced. You might familiarize the students with the method, then assign the problems to practice, OR you might present all four explanations, and then assign the practice problems to review. Some students will catch on rapidly and will not need to go through all of the steps while others will need more repetition and practice. Differentiate your instruction accordingly. Try working in pairs or small groups since students tend to learn from each other.

-----------------------------------------------------------------------------

$5.25
Included in this resource are the following:
  • A detailed explanation of this factoring method.
  • Five variations when using this method
  • Five sets of practice problems – 30 in total
  • Two sets of review problems – 12 total
  • Answers Keys with the complete problem-solving process

If your students don't understand FOIL, Try Multiplying Binomials Using the Box Method

I tutored a student this summer who was getting ready to take Algebra II. He is a very visual, concrete person that needs many visuals to help him to succeed in math. We worked quite a bit on multiplying two binomials.

There are three different techniques you can use for multiplying polynomials. You can use the FOIL method, Box Method and the distributive property. The best part about it is that they are all the same, and if done correctly, will render the same answer.!

Because most math teachers start with FOIL, I started there. The letters FOIL stand for First, Outer, Inner, Last. First means multiply the terms which occur first in each binomial. Then Outer means multiply the outermost terms in the product. Inner is for "inside" so those two terms are multiplied—second term of the first binomial and first term of the second). Last is multiplying the last terms of each binomial.
My student could keep FOIL in his head, but couldn't quite remember what the letters represented, let alone which numbers to multiply; so, that method was quickly laid aside. 

I next tried the Box Method. Immediately, it made sense to him, and we were off to the races, so to speak. He continually got the right answer, and his confidence level continued to increase. Here is how the Box Method works.

First, you draw a 2 x 2 box. Second, write the binomials, one along the top of the box, and one binomial down the left hand side of the box. Let's assume the binomials are 2x + 4 and x + 3.

          (2x + 4) (x + 3)

Now multiply the top row by x; that is x times 2x and x times +4., writing the answers in the top row of the box, each in its own square.  After that, multiply  everything in the top row by +3, and write those answers in the second row of the box, each in its own square.

Looking at the box, circle the coefficients that have an x. They are located on the diagonal of the box.
To find the answer, write the term in the first square on the top row, add the terms on the diagonal, and write the number in the last square on the bottom row. Voila! You have your answer!

A Go Figure Debut for a Special Ed Math Teacher Who's New!


Meet Brooks Jones. This is Brooks’ ninth year teaching; however, education is her second career. Currently she is a middle school special education teacher, co-teaching in math and English/Language Arts classrooms in grades 6, 7 and 8. She was drawn to the classroom after working in the corporate world, doing graphic design, marketing, public relations and writing. She wanted to do something more meaningful with her days and teaching has certainly provided purpose to her life.

She is licensed in elementary education, special education, reading specialist and high school math, but most of her years in the classroom have been spent as a special education math teacher, providing mostly inclusion services for students needing that extra boost to reach grade level standards. Many of the resources in her store are designed to help middle and high school students understand pre-algebra and algebra concepts. She uses a lot of visuals and color-coding, which helps them remember math basics. In addition, she tries to teach the underlying concepts, not just the algorithms, because she wants students to know why we rely on certain algorithms to solve math problems.

Brooks loves seeing students engaged and interested in math. She believes math can open doors for people, and so she tries to connect the content in the classroom with realities of daily life in order to make learning relevant for students. There is nothing more rewarding than seeing that glow of new understanding unfold on the face of a smiling student. Teaching is truly a miraculous career, and she wouldn't trade it for anything.

Last but not least, Brooks is married with three children: one is grown with two kids of his own; one just started college this fall, and one is still at home enjoying her senior year of high school. They have two cats and a dog. In addition, Brooks likes reading, knitting, playing the ukulele and singing when she isn’t working on new teaching resources!

FREE
Brooks store contains 55 products; two of them are free. Most of her resources are math related. Her free item is entitled “Laws and Exponents Poster/Anchor Chart.” Since working with exponents can be confusing, help your students master the properties and laws of exponents with this jam-packed one-page resource, which can be used as a cheat sheet, anchor chart, or classroom poster. Concepts included are the properties of multiplication, division, zero and negative exponents, as well as rational (fractional) exponents. Properties are color-coded, shown with variable symbols and explained in clear language.

$4.75
Brooks featured paid resource is a math bundle of two resources about quadratic equations. It is an introduction to quadratic functions and the relationship between their equations and graphs using guided notes and practice activities. It is great for beginning a unit on quadratic functions as part of an Algebra I class, or for reviewing concepts before moving to more advanced content in higher-level classes (Algebra 2, Pre-Calculus). By purchasing the bundle, you save 15% vs. buying these resources individually!

Brooks also has a blog called The Educator's Lifeline. I highly recommend that you read the May 26, 2023 post on Math Education and AI.

As many of you know, I work with remedial math students on the college level. This year, we have more students than ever. Brooks’ resources are perfect for these struggling students in that she gives them more than just an abstract way of learning algebra. She uses visuals, color coding, etc. to help them learn and memorize. As a math teacher, I believe that is what we all should be doing; so, take time to check out Brooks’ store, and while you are there, download one of her two freebies.

Algebra - Using Two-Sided Colored Beans to Add and Subtract Positive and Negative Numbers


When it comes to adding and subtracting positive and negative numbers, many students have great difficulty. In reality, it is a very confusing and abstract idea; so, it is important to give the students a concrete visual to assist them in seeing the solution. This idea is based on the Conceptual Development Model which is important to use when introducing new math concepts. (See the July 26, 2023 for more details about this learning model.) As a result, when teaching the concept of adding and subtracting positive and negative numbers, what would fall into each category?

When using the two-sided colored beans, the concrete stage of the Model would be where two-sided colored beans are used as an actual manipulative that can be moved around or manipulated by the students. There are a few rules to remember when using the beans.
  1. The RED beans represent negative numbers.
  2. The WHITE beans represent positive numbers. 
  3. One RED bean can eliminate one WHITE bean, and one WHITE bean can cancel out one RED bean. 
  4. All problems must be rewritten so that there is only one sign (+ or -) in front of each number.
Sample Problem

1) The student is given the problem - 5 + 2.

2) Since -5 is negative, the student gets out five red beans, and then two white beans because the 2 is positive.

3) Since some of the beans are red and two are white, the student must match one red bean with one white bean. (I tell my students that this is barbaric because the red beans eat the white beans. They love it!)

4) Because three red beans have no partner (they're left over) the answer to – 5 + 2 = - 3. (See example above.)

After mastering the concrete stage of the Conceptual Development Model, the students would move on to the pictorial stage. Sketching a picture of the beans would be considered pictorial. Have students draw circles to represent the beans, leaving the circles that denote positive numbers white and coloring the circles that represent negative numbers red.

As an example, let’s do the problem 3 - +5. First, rewrite the problem as 3 - 5. Now draw three white beans. Draw five more beans and color them red to represent -5. Match one white bean to one red bean. Two red beans are left over; therefore, the answer to 3 - +5 is -2.

3 - +5 = 3 – 5 = -2 

When students understand the pictorial stage, then abstract problems such as the ones in textbooks can be presented. (Notice, the textbook is the last place we go for an introduction.) I have found that most of my remedial college students move straight from the concrete stage (beans) to the abstract stage without any problem. Many put away the beans after two or three lessons. What works best for your students as they master this algebraic concept is something you will have to determine.

$5.35
If you would like a resource that gradually goes through these lessons, you can purchase it on Teachers Pay Teachers. It introduces the algebraic concept of adding and subtracting positive and negative numbers and contains several integrated hands-on activities. They include short math lessons with step-by-step instructions on how to use the beans, visual aids and illustrations, four separate and different practice student worksheets with complete answers in addition to detailed explanations for the instructor.

You are invited to the Inlinkz link party!

Click here to enter

Skip Counting and Learning How to Multiply Using Pattern Sticks

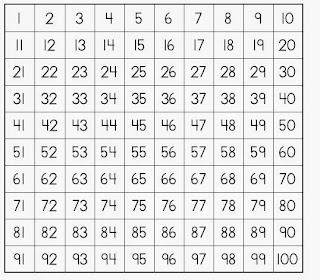
Most elementary teachers use a Hundreds Board in their classroom.  It can be used for introducing number patterns, sequencing, place value and more. Students can look for counting-by (multiplication) patterns. Colored disks, pinto beans or just coloring the squares with crayons or colored pencils will work for this. Mark the numbers you land on when you count by two. What pattern do they make? Mark the counting-by-3 pattern, or mark the 7's, etc. You may need to print several charts so your students can color in the patterns and compare them. I usually start with the 2's, 5's and 10's since most children have these memorized.

On the other hand, the Hundreds Board can also be confusing when skip counting because there are so many other numbers listed which easily create a distraction.  I have found that Pattern Sticks work much better because the number pattern the student is skip counting by can be isolated. Pattern Sticks are a visual way of showing students the many patterns that occur on a multiplication table.  Illustrated below is the pattern stick for three. As the student skip counts by three, s/he simply goes from one number to the next (left to right).


Martian Fingers
For fun, I purchase those scary, wearable fingers at Halloween time. (buy them in bulk from The Oriental Trading Company - click under the fingers for the link.) Each of my students wears one for skip counting activities. I call them the Awesome Fingers of Math! For some reason, when wearing the fingers, students tend to actually point and follow along when skip counting.

Most students enjoy skip counting when music is played. I have found several CD's on Amazon that lend themselves nicely to this activity.  I especially like Hap Palmer's Multiplication Mountain.  My grandchildren think his songs are catchy, maybe too catchy as sometimes I can't get the songs out of my mind!

$3.25
Think about this.  As teachers, if we would take the time to skip count daily, our students would know more than just the 2's, 5's and 10's.  They would know all of their multiplication facts by the end of third grade. And wouldn't the fourth grade teacher love you?!?

IMPORTANT:  If you like this finger idea, be sure that each student uses the same finger every time to avoid the spreading of germs. Keeping it in a zip lock bag with the child’s name on the bag works best. (Believe it or not, when I taught fourth grade, the students would paint and
decorate the fingernails!)

To help your students learn their multiplication facts, you might like the resource entitled Pattern Sticks. It is a a visual way of showing students the many patterns on a multiplication table. It also teaches how you to use the pattern sticks to recognize equivalent fractions, reduce fractions, and to change improper fractions to mixed numbers.

You're Teaching Fractions All Wrong! Don't Flip When You Divide!


My college students in remedial math just finished the chapter on fractions. Talk about mathphobia. Dividing fractions was the most confusing for them because it requires finding the reciprocal of the second fraction, changing the division sign to a multiplication sign, and then multiplying the numerator times the numerator and the denominator times the denominator.

Let me introduce a new method entitled "Just Cross".

First and foremost, you must understand what division is. The statement 8 ÷ 4 means 8 divided into 4 equal sets, OR how many fours are in eight, OR how many times can we subtract 4 from 8? (Yes, division is repeated subtraction.)

Let me explain this using a hands-on visual. Let’s assume the fraction problem is:
The question being asked is, “How many ¼’s are in ½?” 
First, fold a piece of paper in half. The figure on the left represents ½. Next, fold the same sheet of paper in half again to make fourths as seen in the illustration on the right. When you unfold the paper, you will notice a total of four sections. So answering the original question: “How many ¼’s are in ½”, you can see that the half sheet of paper contains two parts; therefore:
Using the same example, to work the problem, the fraction 1/4 would have to be flipped to 4/1 nd then 1/2 would have to multiplied by 4/1 to get the correct answer of 2. That is why the division of fractions requires that the second fraction be inverted and the division sign be changed to a multiplication sign.

Let’s use the same fraction problem, but let’s utilize a different method entitled Just Cross. 
  • Cross your arms as a hands-on way of remembering the process.
  • Now multiply the denominator of 4 by 1 the denominator of 2 by1 as seen below. (We do nothing with the denominators.) Notice we always start on the right side and then we go to the left side. If it is done the opposite way, the answer will be incorrect. The answer of our first "cross" is the numerator (4 x 1); the answer to our second "cross" (2x1) is the denominator.
  • Now simply divide 4 by 2 to get the answer of 2.
No flipping; no reciprocal, no changing the division sign to a multiplication sign. Just Cross and divide. Amazingly, it works every time. 
-------------------------------------------------------------------------------
$4.75

Although fractions are something every student should learn, often times numerous students are left behind in the mathematical dust when a math textbook is followed page by page. I have a resource that features different ways to teach fractions using hands-on strategies similar to the one above. The unconventional techniques described in this math resource will always work.  Just go to Unlocking Fractions for the Confused and Bewildered.

Linking Literature and Math Using the Book, "Math Curse." It's the Perfect Book for the Beginning of the Year!

I love books that link math and literature, and one of my favorites is Math Curse by Jon Scieszka. Published in 1995 through Viking Press, the book tells the story of a student who is cursed by the way mathematics works in everyday life. It is a tale where everything is a math problem, from tabulating teeth to calculating a bowl of corn flakes. Everything in life becomes a math problem.

First you see the math teacher, Mrs. Fibonacci, (don’t you love that name?) declare, “You know, you can think of almost everything as a math problem.” Then you watch as the student turns into a “raving math lunatic” since s/he believes “Mrs. Fibonacci has obviously put a math curse on me.”

From sunrise to sunset, the student anxiously mulls over the answers to countless calculations such as: How much time does it take to get ready and be at the bus stop? (a problem the reader can solve.). Estimate how many M M's you would eat if you had to measure the Mississippi River using M Ms. There is even an English word problem: “If mail + box = mailbox, does lipstick – stick = lip? Does tunafish + tunafish = fournafish?” (silly, but funny.) A class treat of cupcakes becomes a study in fractions, while a trip to the store turns into a problem of money. The story continues until the student is finally free of the math curse, but then again Mr. Newton, the science teacher, regrettably says, “You know, you can think of almost everything as a science experiment.”

Math Curse is full of honest to goodness math problems (and some rather unrelated bonus questions, such as "What does this inkblot look like?"). Readers can try to solve the problems and check their answers located on the back cover of the book. The problems are perfect to get students’ minds working and thinking about how math really does apply to their everyday life.

The illustrations by Lane Smith are one of a kind. They are busy and chaotic to reflect the “math zombie” this student becomes. Many resemble a cut and paste project, with some images touching or overlapping others. Mostly dark colors are used especially when the student begins to dream s/he is trapped in a blackboard room covered with never-ending math problems. (a nightmare for many) Smith’s art work makes Scieszka's words come to life and helps to paint a picture of what is going through the mind of the main character as s/he deals with the dreaded math curse.

John Scieszka does a remarkable job of breaking down the typical school day into math problems while also adding some tongue-in-cheek and light hearted humor which every mathphobic needs. The math is perhaps a little advanced for elementary students, but the problems are perfect for middle school or high school students.

Math Curse also demonstrates how a problem may seem difficult, but if you are persistent, you can find the solution to the problem. The book teaches not to fear or be anxious about math or for that matter, any other subject in school. Despite the fact the main character is completely overwhelmed by mathematics, it allows students who struggle with the identical feeling to know they are not alone. Any student who has ever been distressed over numbers, fractions, word problems and the like will certainly identify with the main character.

As a math teacher, I think this book makes math fun as well as interesting. Although I recognize math is everywhere in everyday life, I never realized just how much until I read the Math Curse and mathematically saw the day of a typical student. I believe what sets Math Curse apart from other books is that it accurately illustrates and explains how math is actually used and applied in day-to-day life. I love the story, the message, and especially the content.

You are invited to the Inlinkz link party!

Click here to enter

How Many Classroom Management Rules Does A Teacher Really Need?


Now that most of us are getting geared up for a new school year, it's time to think about what classroom rules need to be established. Maybe the ones you had last year just didn’t work, and you are looking for a change. I could recommend many "Do this or this will happen" or "Please don't do this as it will break my heart" statements, but lists can become very long and mind-numbing. Maybe that is why God only gave Ten Commandments. Fewer rules mean less has to be memorized. So, maybe we need to ask ourselves: “How many classroom rules are really needed?” 

I would suggest making a few general rules that are clear and understandable since being too specific often leads to complicated, wordy rules that might cover every possible situation. Most of the time, I post six simple classroom rules (only two words each) in my room which encompass my main areas of concern. I find them to be more than sufficient to govern general behaviors, and because alliteration is used, the rules are easy for all of my students to remember.

1.  Be Prompt – In other words, be on time to school/class/group.

2.  Be Prepared – Bring the items you need to class or to a group. Study for upcoming tests. Have your homework completed and ready to turn in. 

3.  Be Polite – This rule focuses on how we treat each other. Show respect for your teacher(s) and your fellow students in the classroom, in the school, and on the playground.

4.  Be Persistent - The final rule spotlights the need to stay on task and complete an assignment even though it might be difficult. 

5. Be Productive - Always put forth your best effort! Grades are achieved; not received; so, do your best at all times.

6. Be Positive – Bad days happen! If you are having one of those days, I do understand. Please just inform me before class that you are having a bad day, and I will try to leave you alone during class discussion. This is not to be abused.

I firmly believe that class rules must cover general behaviors, be clear as well as understandable. Being too specific often leads to complicated, wordy rules that might cover every possible situation, but are impossible to remember.  (A good example are the IRS tax rules which I still have difficulty comprehending). 
Here are a few things to consider when communicating your classroom rules.
$2.60
  • Establish clear expectations for behavior from day one.
  • Use techniques such as interactive modeling to teach positive behavior.
  • Reinforce positive behavior with supportive teacher language.
  • Quickly stop misbehavior.
  • Restore positive behavior so that children retain their dignity and continue learning.
If you are interested in using these six rules in your classroom, check them out on Teachers Pay Teachers. Each two word rule is written as a one page chart, and is ready to download and laminate to hang in your classroom.

Developing and Writing Effective Math Lesson Plans That Work!

We often hear of research based strategies and how to use them in our classrooms. Having worked at two colleges in the past 20 years, I have discovered that some who are doing this research have never been in a classroom or taught anyone under the age of 18!  (Sad but True)  Then there are others who truly understand teaching, have done it, and want to make it more effective for everyone. That's the kind of research I am anxious to use.  I came across the Conceptual Development Model while teaching a math methods class to future teachers. It was one of the first research models that I knew would work. 

The Conceptual Development Model involves three stages of learning: 1) concrete or manipulative, 2) pictorial, and 3) the abstract.  The concrete stage involves using hands-on teaching which might involve the use of math manipulatives or real items. Next, the pictorial stage utilizes pictures to represent the real objects or manipulatives. A visual such as a graphic organizer would also fit in this stage. Last, the abstract stage of development entails reading the textbook, using numbers to compute, solving formulas, etc. Let's look at two classroom examples.

Example #1:
  You are a first grade teacher who is doing an apple unit.  You decide to have the children graph the apples, sorting them by color.

Concrete:  Using a floor graph, the children use real apples to make the graph.

Pictorial:  The children have pictures of apples that they color and then put on the floor graph.

Abstract:  The children have colored circles which represent the apples.

Example #2:  You are a fifth grade teacher who wants to teach how to find the volume of a cube or rectangular solid.

ConcreteBring a large box into the classroom, a box large enough for the children to climb inside, OR have the students build 3-D objects using multi-link cubes.

PictorialGive the students pictures of 3D objects which are drawn but shows the cubes used to make the solid. Have the students count the cubes to determine the volume.

AbstractHave students use the formula l x w x h to find volume.

Requiring my perspective teachers to think about this model and to use it when planning a math unit dramatically changed the quality of instruction which I observed in the classroom. 

$3.00
Now that I teach mathphobics on the college level, I am finding this model to be a crucial part of my planning.  Most of my students started math at the abstract level, "Open your books to page...." without any regard to the other two stages of development. Using manipulatives and graphic organizers have changed my students' ability to learn math, and some have even ended the semester by saying, "I like math". Maybe this is a model we should all consider implementing.

If you want more examples and suggestions about using this model to write math lesson plans, click on the resource cover. 

Also look at the resource entitled Graphing without Paper or Pencil in which is appropriate for grades K-5 and is based on the Conceptual Model of Development: concrete to pictorial to abstract.