menu   Home Answers Math Games Free Resources Contact Me  
Showing posts with label Algebra. Show all posts

In Algebra, Why is any number to the zero power equal to one?


Sometimes my college students like to ask me what seems to be a difficult question. (In reality, they want to play Stump the Teacher.)  I decided to find out what sort of answers other mathematicians give; so, I went to the Internet and typed in the infamous question, "Why is any number to the zero power one?"  It was no surprise to find numerous mathematically correct answers, most written in what I call "Mathteese" - the language of intelligent, often gifted math people, who have no idea how to explain their thinking to others.  I thought, "Wow!  Why is math always presented in such complicated ways?"  I don't have a response to that, but I do know how I introduce this topic to my students. 

Since all math, and Imean all math, is based on patterns and not opinions or random findings, let's start with the pattern you see on the right.  Notice in this sequence, the base number is always 3.  The exponent is the small number to the right and written above the base number, and it shows how many times the base number, in this case 3, is to be multiplied by itself. 

(Side note: Sometimes I refer to the exponent as the one giving the marching orders similar to a military commander. It tells the base number how many times it must multiply itself by itself. For those students who still seem to be in a math fog and are in danger of making the grave error of multiplying the base number by the exponent, have them write down the base number as many times as the exponent says, and insert the multiplication sign (×) between the numbers. Since this is pretty straight forward, it usually works!) 

Notice our sequence starts with 31 which means 3 used one time; so, this equals three; 3means 3 × 3 = 9, 33 = 3 × 3 × 3 = 27, and so forth. As we move down the column, notice the base number of 3 remains constant, but the exponent increases by one. Therefore, we are multiplying the base number of three by three one additional time.

Now let's reverse this pattern and move up the column. How do we get from 243 to 81? That's right! We divide by three because division is the inverse operation (the opposite) of multiplication. How do we get from 243 to 81? That's right! We divide by three because division is the inverse operation (the opposite) of multiplication. Notice as we divide each time, the exponent by the base number of 3 is reduced by one. Let's continue to divide by three as we move up the column. 27÷ 3 = 9; 9 ÷ 3 = 3. Now we are at 3= 3 which means we must divide 3 by 3 which gives us the quotient of 1. Notice, to fit our pattern, the 3 in the left hand column would have to be 30; so, 3must equal one!

This works for any number you wish to put in the left hand column. Try substituting the base number of three with two. Work your way up the sequence dividing by two each time. You will discover that two divided by two equals one (20 = 1). Therefore, we can conclude that any natural number with an exponent of 0 is equal to one. (Zero is not included; it's another mystery to solve.)

What happens if we continue to divide up the column past 30 ?   (Refer back to the sequence on the left hand side.)  Based on the pattern, the exponent of zero will be one less than 0 which gives us the base number of 3 with a negative exponent of one or 3-1 .    To maintain the pattern on the right hand side, we must divide 1 by 3 which looks like what you see on the left. Continuing up the column and keeping with our pattern, 3 must now have a negative exponent of 2 or 3-2 and we must divide 1/3 by 3 which looks like what is written on the left.

Each time, the exponent by the base number of 3 is reduced by one. Let's continue to divide by three as we move up the column. 27÷ 3 = 9; 9 ÷ 3 = 3. Now we are at 31 = 3 which means we must divide 3 by 3 which gives us the quotient of 1. Notice, to fit our pattern, the 3 in the left hand column would have to be 30; so, 3must equal one! This works for any number you wish to put in the left hand column. Try substituting the base number of three with two. Work your way up the sequence dividing by two each time. You will discover that two divided by two equals one (20 = 1). Therefore, we can conclude that any natural number with an exponent of 0 is equal to one. (Zero is not included; it's another mystery to solve.)

As a result, the next two numbers in our pattern are..............??

Isn't it amazing how a pattern not only answers the question: "Why is any number to the zero power one?" But it also demonstrates why a negative exponent gives you a fraction as the answer. (By the way math detectives, do you see a pattern with the denominators?)
 
         Mystery Solved!   Case Closed!

This lesson is available on a video entitled:  Why Does "X" to the Power of 0 Equal 1?

----------------------------------------------------------------------------------------

$4.25

Want simple, visual answers to other difficult math questions? Try this resource entitled Six Challenging Math Questions with Illustrated Answers. Many of the answers feature a supplementary video for a more detailed explanation.

In Algebra, FOIL is NOT the Only Way to Multiply Polynomials.

Using FOIL
In more advanced math classes, many instructors happen to hate "FOIL" (including me) because it only provides confusion for the students. Unfortunately, FOIL (an acronym for first, outer, inner and last) tends to be taught as THE way to multiply all polynomials, which is certainly not true. As soon as either one of the polynomials has more than a "first" and "last" term in its parentheses, the students are puzzled as well as off course if they attempt to use FOIL. If students want to use FOIL, they need to be forewarned: You can ONLY use it for the specific case of multiplying two binomials. You can NOT use it at ANY other time!

When multiplying larger polynomials, most students switch
to vertical multiplication, because it is much easier to use, but there is another way. It is called the clam method. (An instructor at the college where I teach says that each set of arcs reminds her of a clam. She’s even named the clam Clarence; so, at our college, this is the Clarence the Clam method.)

Let’s say we have the following problem:

(x + 2) (2x + 3x – 4)

Simply multiply each term in the second parenthesis by the first term in the first parenthesis. Then multiply each term in the second parenthesis by the second term in the first parenthesis.

I have my students draw arcs as they multiply. Notice below that the arcs are drawn so they connect to one another to designate that this is a continuous process. Begin with the first term and times each term in the second parenthesis by that first term until each term has been multiplied.


When they are ready to work with the second term, I have the students use a different color.  This time they multiply each term in the second parenthesis by the second term in the first while drawing an arc below each term just as they did before.  The different colors help to distinguish which terms have been multiplied, and they serve as a check point to make sure no term has been missed in the process.

As they multiply, I have my students write the answers horizontally, lining up the like terms and placing them one under the other as seen below. This makes it so much easier for them to add the like terms:


This "clam" method works every time a student multiplies polynomials, no matter how many terms are involved.

Let me restate what I said at the start of this post: "FOIL" only works for the special case of a two-term polynomial multiplied by another two-term polynomial. It does NOT apply to in ANY other case; therefore, students should not depend on FOIL for general multiplication. In addition, they should never assume it will "work" for every multiplication of polynomials or even for most multiplications. If math students only know FOIL, they have not learned all they need to know, and this will cause them great difficulties and heartaches as they move up in math.

Personally, I have observed too many students who are greatly hindered in mathematics by an over reliance on the FOIL method. Often their instructors have been guilty of never teaching or introducing any other method other than FOIL for multiplying polynomials. Take the time to show your students how to multiply polynomials properly, avoid FOIL, if possible, and consider Clarence the Clam as one of the methods to teach. 


You are invited to the Inlinkz link party!

Click here to enter

A New Approach to the Order of Operations (PEMDAS)


Any math teacher who teaches the Order of Operations is familiar with the phrase, "Please Excuse My Dear Aunt Sally".  For the life of me, I don't know who Aunt Sally is or what she has done, but apparently we are to excuse her for the offense.  In my math classes, I use "Pale Elvis Meets Dracula After School".  Of course both of these examples are mnemonics or acronyms; so, the first letter of each word stands for something.  P = Parenthesis, E = Exponents, M = Multiplication, D = Division, A = Addition, and S = Subtraction

I have always taught the Order of Operations by just listing which procedures should be done first and in the order they were to be done.  But after viewing a different way on Pinterest, I have changed my approach. Here is a chart with the details and the steps to "success" listed on the right.

Since multiplication and division as well as addition and subtraction equally rank in order, they are written side by side. What I like about this chart is that it clearly indicates to the student what they are to do and when.  To sum it up:

When expressions have more than one operation, follow the rules for the Order of Operations:
  1. First do all operations that lie inside parentheses.
  2. Next, do any work with exponents or radicals.
  3. Working from left to right, do all the multiplication and division.
  4. Finally, working from left to right, do all the addition and subtraction.
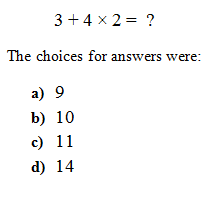
Failure to use the Order of Operations can result in a wrong answer to a problem.  This happened to me when I taught 3rd grade.  On the Test That Counts, the following problem was given.
The correct answer is 11 because you multiply the 4 x 2 and then add the 3, but can you guess which answer most of my students chose?  That's right - 14!  From that year on, the Order of Operations became a priority in my classroom.  Is it a priority in yours?  Should it be?

-------------------------------------------------------------------------------
$3.75

I have a product in my store entitled: Order of Operations - PEMDAS, A New Approach. This ten page resource includes a lesson plan outline for introducing PEMDAS, an easy to understand chart for the students, an explanation of PEMDAS for the student as well as ten practice problems. It is aligned with the fifth grade common core standard of 5.OA.1. Just click on the price under the cover page if it is something you might like.

Adding and Subtracting Positive and Negative Numbers Using a Hands-On Approach


When it comes to adding and subtracting positive and negative numbers, many students have great difficulty. In reality, it is a very confusing and abstract idea; so, it is important to give the students a concrete visual to assist them in seeing the solution. This idea is based on the Conceptual Development Model which is important to use when introducing new math concepts.  As a result, when teaching the concept of adding and subtracting positive and negative numbers, what would fall into each category?

When using the two-sided colored beans, the concrete stage of the Model would be where two-sided colored beans are used as an actual manipulative that can be moved around or manipulated by the students. There are a few rules to remember when using the beans.
  1. The RED beans represent negative numbers.
  2. The WHITE beans represent positive numbers. 
  3. One RED bean can eliminate one WHITE bean, and one WHITE bean can cancel out one RED bean. 
  4. All problems must be rewritten so that there is only one sign (+ or -) in front of each number.
Sample Problem

1) The student is given the problem - 5 + 2.

2) Since -5 is negative, the student gets out five red beans, and then two white beans because the 2 is positive.

3) Since some of the beans are red and two are white, the student must match one red bean with one white bean. (I tell my students that this is barbaric because the red beans eat the white beans. They love it!)

4) Because three red beans have no partner (they're left over) the answer to – 5 + 2 = - 3. (See example above.)

After mastering the concrete stage of the Conceptual Development Model, the students would move on to the pictorial stage. Sketching a picture of the beans would be considered pictorial. Have students draw circles to represent the beans, leaving the circles that denote positive numbers white and coloring the circles that represent negative numbers red.

As an example, let’s do the problem 3 - +5. First, rewrite the problem as 3 - 5. Now draw three white beans. Draw five more beans and color them red to represent -5. Match one white bean to one red bean. Two red beans are left over; therefore, the answer to 3 - +5 is -2.

3 - +5 = 3 – 5 = -2 

When students understand the pictorial stage, then abstract problems such as the ones in textbooks can be presented. (Notice, the textbook is the last place we go for an introduction.) I have found that most of my remedial college students move straight from the concrete stage (beans) to the abstract stage without any problem. Many put away the beans after two or three lessons. What works best for your students as they master this algebraic concept is something you will have to determine.

$5.40
If you would like a resource that gradually goes through these lessons, you can purchase it on Teachers Pay Teachers. It introduces the algebraic concept of adding and subtracting positive and negative numbers and contains several integrated hands-on activities. They include short math lessons with step-by-step instructions on how to use the beans, visual aids and illustrations, four separate and different practice student worksheets with complete answers in addition to detailed explanations for the instructor.

Factoring Polynomials Using a "Sure Fire" Method

I spent the summer months tutoring a high school girl who was getting ready to take Algebra II.  She didn't do very well in Algebra I and with geometry between the two classes, she was lost. Since she is a very concrete, visual person, I knew I needed to come up with different algebraic methods so she could succeed. 

When we got to to factoring trinomials, she really needed help as most of the methods were too abstract for her. For those of you who have forgotten, a trinomial is a polynomial that has three terms. Most likely, students start learning how to factor trinomials written in the form ax2 + bx + c

There are several different methods that can be used to factor trinomials.  The first is guess and check using ac and grouping. Find two numbers that ADD up to b and MULTIPLY to get ac in ax2 + bx + c. The second approach is the box method. You write the equation in a two-by-two box. This method is more thoroughly explained on You Tube. Look up factoring trinomials using the box method.  There is also the method of slide and divide which again you can look up on You Tube to see exactly how that works. Grouping is another method. Students need to choose which method they understand and which one works best for them. With continual practice, they will get better and faster at using it.

My favorite method is the one most students understand and grasp. It builds on the ac method, but takes it takes it one step further. It made sense to my student, and she was easily factoring trinomials after only two tutoring sessions.

Because it worked so well, I developed a new math resource. It is a step-by-step guide that teaches how to factor quadratic equations in a straightforward and uncomplicated way. It includes polynomials with common monomial factors, and trinomials with and without 1 as the leading coefficient. Some answers are prime. This simple method does not treat trinomials when a =1 differently since those problems are incorporated with “when a is greater than 1” problems.

Following each explanation (five total) are a set of six practice problems that replicate the method introduced. You might familiarize the students with the method, then assign the problems to practice, OR you might present all four explanations, and then assign the practice problems to review. Some students will catch on rapidly and will not need to go through all of the steps while others will need more repetition and practice. Differentiate your instruction accordingly. Try working in pairs or small groups since students tend to learn from each other.

-----------------------------------------------------------------------------

$5.25
Included in this resource are the following:
  • A detailed explanation of this factoring method.
  • Five variations when using this method
  • Five sets of practice problems – 30 in total
  • Two sets of review problems – 12 total
  • Answers Keys with the complete problem-solving process

Math Task Cards - Creating Algebraic Equations Using Only Four Numbers

Are you ready to take your math skills to the next level? Solving algebraic math puzzles can help you hone your problem-solving skills, increase your analytical and critical thinking skills and boost your confidence in tackling difficult equations. Algebraic math puzzles are a great way to learn the fundamentals of algebra, strengthen your understanding of basic operations and apply core math concepts. 

Students need plenty of different opportunities to practice math in ways that both review and extend what they have learned. Because many of my remedial math college students (I call them mathphobics) lack problem solving skills or need practice, I use math task cards for them to complete individually or in pairs as an upfront focus activity. These math task cards rely on logic, mental math, and analytical skills and provide practice in building and creating equations while using PEMDAS. The goal is to expose students to various problem-solving strategies. 

Why task cards? Because task cards can target a specific math skill or concept while allowing the students to only focus on one problem at a time. This format prevents mathphobics from feeling overwhelmed and provides them a sense of accomplishment when a task is completed. Furthermore, the students are more engaged and often acquire a more in-depth understanding of the math concept. By trying new and different strategies and modifying their process, students will be more successful with each puzzle they solve.

The math task cards my students use contain two different math puzzles. The puzzles vary in difficulty from easy to challenging. Since there are easy, medium level and challenging puzzles, differentiation is made simple by choosing the level of difficulty appropriate for each student or team.

Each math puzzle is a square divided into four parts with a circle in the middle of the square. Each math puzzle contains four numbers, one in each corner of the square, with the answer in the circle. Using the four numbers, (each number must be used once) the student is to construct an equation that equals the answer contained in the circle. Students may use all four signs of operation (addition, subtraction, multiplication, division) or just one or two. In addition, each sign of operation may be used more than once. Parenthesis may be needed to create a true equation, and the Order of Operations (PEMDAS) must be followed.

Here is an example of what I mean. 

FREE
Were you able to figure out the puzzle, using all four numbers?

These task card or math puzzles can be used…

  • At math centers
  • As a math problem solving activity for students who finish early
  • As enrichment work
  • To give students extra practice with a math concept or skill
  • As individual work
  • In small groups
  • As partner work

A free resource containing three such task cards is available at my TPT store.

I believe that math puzzles are key to getting students interested in mathematics, developing their skills, and creating an environment that makes learning enjoyable. So, let's unlock the door to learning with math puzzles and task cards!

_________________________________________________________

By the way, I didn't want to leave you without providing you with the answer to the above puzzle.  It is...


Algebraic Terms - Finding the Greatest Common Factor and Least Common Multiple Using a Venn Diagram

I tutor math at the college where I teach. Many of those students have been confused on how to find the greatest common factor for a set of algebraic terms. Having an elementary background, I introduce them to a factor tree which, believe it or not, many have never seen.

When just a rule is given by an instructor, often times, students get lost in the mathematical process. I have found that utilizing a visual can achieve an understanding of a concept better than just a rule. A Venn Diagram is such a visual and helps students to follow the process and understand the connection and relationship between each step of finding the GCF and LCM.

It's important to always begin with the definitions for the
words factor, greatest common factor and least common multiple. If a student doesn't know the vocabulary, they can't do the work! I continue by explaining and illustrating what a factor tree is (on your left) and how to construct and use a Venn Diagram as a graphic organizer.

Let's suppose we have the algebraic terms of 75xy and 45xyz. I have the students construct factor trees for each of the numbers as illustrated on the left.

Then all the common factors are placed in the intersection of the two circles. In this case, it would be the 5 and the xy. 

The students then put the remaining factors and variables in the correct big circle. Five and three would go in the left hand circle and the three 2’s and the z would be placed in the right hand circle.

The intersection is the GCF; so, the GCF for 75xy and 40xyz is 5xy.   To find the LCM, multiply the number(s) in the first big circle by the GCF (numbers in the intersection) times the number (s) in the second big circle.

5 × 3 × GCF × 2 × 2 × 2 × z = 15 × 5xy × 8z = 240. The LCM is 600xyz

Free Item
This method is applicable and helpful in algebra when students are asked to find the LCM or GCF of a set of algebraic terms such as: 25xy, 40xyz. (LCM = 200xyz; GCF = 5xy) or when they must factor out the GCF from a polynomial such as 6x2y+ 9xy2. Using a Venn Diagram is also an effective and valuable tool when teaching how to reduce fractions. 

Are you interested in finding out more about this method?  Then download my newest free resource entitled: Algebraic Terms and Fractions - Finding the Greatest Common Factor and the Lowest Common Multiple Using a Venn Diagram. 

Why is 'x' Usually the Unknown in Algebra?

Ted Talk
Again, it's time for some math information you might have missed in school. (Don't worry, I missed a great deal as well.)  Today's question is: Why is the letter "x" the symbol usually used for an unknown?

Even though the letter "x" is commonly used in mathematics, its use often appears in non-numerical areas within different industries such as The X Files or Project X. Terry Moore clears up this mathematical mystery in a TED Talk presentation at Long Beach, California.  In a short and funny four minute talk, he gives an unexpected answer to "why." Just click under the illustration to find out the reason!

Parabola - The Arch Enemy?

I love to relate math to the real world with my students because that is the only way they will see the relevance.  Our family (son + his wife + three grandkids + husband) just returned from a trip to Orlando.  While driving home from Cocoa Beach, my daughter-in-law noticed a purple arch.  Being that my mind is always, always thinking about math, I informed her that it was a parabola with a negative slope.  My son, who is an engineer, starting talking about slope, and the two of us shared some equations such as the one for lines y = mx + b (much to the chagrin of the other travelers stuck in the car with us).

Mathematically speaking, a parabola is a two-dimensional, symmetrical curve or simply, a special curve shaped like an arch.  All parabolas are vaguely “U” shaped, and they have a highest or lowest point called the vertex.  The vertex is the place the parabola makes it sharpest turn.  Any point on a parabola is at an equal distance from a fixed point (the focus), and a fixed straight line (the directrix). Parabolas may open up or down and may or may not have x-intercepts, but they will always have a single y-intercept. Those that open up have a positive slope (they form a smile) and those that open down have a negative slope (they form a frown).  We always get a parabola when we graph a quadratic equation, an equation that contains a variable that is squared such as y2 = 20x or x2 - 9y = 0.

Now that all of this is as clear as mud for many of you, let's look at some parabolas in real life.  Yes, they are out there!  Can you identify the ones below?


Did the last picture stump you?  Well, it would unless you were from Los Angeles.  It is the
Encounter Restaurant, atop Los Angeles International Airport’s landmark Theme Building.

Other real life examples include....

1) Throwing or Kicking a Ball - If you throw a baseball, kick a soccer ball, shoot an arrow, fire a missile, or throw a stone, it will arc up into the air and come down again following the path of a parabola! (Except for how the air affects it.) The next time you watch a football being thrown from the quarterback to a receiver, think of a parabola.

2) Roller Coasters that arc up and down and sometimes around - the one ride I avoid! When a coaster falls from the peak (vertex) of the parabola, it is rejecting air resistance, and all the bodies are falling at the same rate. The only force here is gravity. Most people (I am NOT included) enjoy or get a thrill out of parabolic-shaped coasters because of the intense pull of gravity.

3) Reflectors - Parabolas are also used in satellite dishes and flashlights. In satellite dishes it helps reflect signals that then go to a receiver, which interprets the signals and shows satellite-transmitted channels on your television. In flashlights, car headlights and spotlights, the parabolic shape helps reflect light. Notice the beam of light coming from the flashlight on your right. See how the light appears to be in the shape of a parabola?


4) Suspension Bridges such as the Golden Gate Bridge, the Brooklyn Bride, the Washington Bridge, etc.  Suspension bridges are capable of spanning long distances and actually are the only type of bridge to span the longest distances possible for a bridge. This is because the shape of the suspension bridge is actually one of the most stable structures there is. In the image of above, can you see how the cables form parabolas?

So now you know parabolas are everywhere even when you are playing ports, watching T.V., riding a roller coaster at your favorite theme park or going cross a suspension bridge.  So what kind of parabola will you display on your face today…a negative parabola (a frown?) or a positive parabola (a smile)?