menu   Home Answers Math Games Free Resources Contact Me  

The Best Laid Plans. . .Writing Lesson Plans

Lesson plans have always been an Achilles heel for me.  I have taught for so-o-o long, that how to teach the lesson as well as knowing the content is not an issue.  I always have a Plan B, C, and D ready - just in case.  I now teach on the college level where no one checks my plans; however, I still write an outline for the day so I know that I have covered the important points. 

My first job, when I retired from our local school system, was teaching math at a private school.  Mind you, I had been teaching math for over twenty years; yet, the administrator wanted me to do detailed plans which had to be turned in every Friday. I grudgingly did them, but would add little comments in the comment section. That space became my way of quietly venting; so, I would write such things as:  "So many lesson plans; so little time. Writing detailed plans is not time well spent.  To plan or to grade, that is the question.  I am aging quickly; so, I need to make succinct plans."

My supervisor finally relented and allowed me to do an outline form of plans. However, he visited often to observe my teaching, which I didn't mind.  At least he knew what was happening in my classroom.  I have learned from teaching and observing student teachers that anyone can come up with dynamite plans, but the question is: "Do the plans match what the teacher is doing in the classroom?"  Remember Madelyn Hunter?  Oh, how my student teachers hated her lesson plan design, but they did learn how to make a good plan. To this day, I still do many of the items such as a focus activity and a lesson reflection at the end.

My Husband's Lesson Plans for a Week in October
As many of you know, my husband is a middle school science teacher. He is the "Sci" part of my name. Anyway, he is in his 43rd year of teaching, and he still does lesson plans - not the detailed ones we did our first couple of years of teaching, but plans he does have. He divides one of his white boards into sections using colored electrical tape as seen in the illustration on the left.  He then writes what each class is doing for the week in a designated square. In this way, the principal, parents, and students know the content that will be covered. Even the substitute (he is rarely sick) has a general idea of the day's activities. If plans change, he simply erases and makes the necessary corrections.

So what kind of plans are you required to do?  Maybe there are no requirements for you, but do you still write plans?  Are they in outline form or just brief notes to yourself?  I am interested in knowing what you do; so, please participate in the this conversation by leaving a comment.

Only $3.00
By the way, do you need a lesson plan that is easy to use, and yet is acceptable to turn into your supervisor or principal?   Check out my three lesson plan templates. One is a generic lesson plan; whereas, the other two are specifically designed for mathematics (elementary or secondary) and reading.  Checklists are featured on all three plans; hence, there is little writing for you to do. These lists include Bloom’s Taxonomy, multiple intelligences, lesson types, objectives, and cooperative learning structures. Just click under the resource cover.


Dots Lots of Fun - Using Dominoes in Math

I am always looking for ordinary items that can be used in the classroom as manipulatives. I'm a firm believer in the Conceptual Development Model which advocates teaching the concrete (using manipulatives) prior to moving to the pictorial before even thinking about the abstract. When I was at the Dollar Tree (a great, inexpensive place to purchase school stuff) I saw sets of dominoes for $1.00 each. Since they were inexpensive and readily available, I decided to create several math activities and games to introduce, reinforce, or reteach math concepts.

The Number 52
Think about it; if you lay a domino horizontally, you have a two digit number. Put two dominoes side-by-side, and a four digit number is created. Now you can work with place value, estimation, or rounding.  How about lining up dominoes in a column, and working on addition (with or without regrouping) or subtraction (with or without renaming)? 

Another perfect domino activity is practicing addition or multiplication facts.  How about adding the two sides of the domino or multiplying the two sides together?

The Fraction 1/4
If a domino is placed vertically, you immediately have a fraction.  Placed one way it is a proper fraction, but rotated around, it is an improper fraction which can then be reduced.  A fraction can also be changed into a division problem, a ratio, a decimal, or a percent.

So think outside that box of dominoes and use them as an inexpensive math manipulative because Dots Lots of Fun!

Check out all my Domino Resources available on Teachers Pay Teachers.
The first two are absolutely FREE!
  1. Dots Fun for Everyone - FREE  Three math activities and one game for the intermediate grades.
  2. Dots Fun - FREE  Three math activities and one game for the primary grades.
  3. Dots Fun   A 24 page resource for grades 1-3 that includes 13 math activities and four games.
  4. Dots Fun for Everyone  A 29 page resource that features 15 math activities and three games for grades 3-6.
  5. Dots Lots of Fun  Seven math games that use dominoes for grades 2-5.

Common Classroom Irritations

Have you ever noticed that the same old problems keep resurfacing year after year in your classroom? Isn’t it funny how the little things sometime put us over the edge? I can always deal with that “special” child, but the continuous line at my desk about drives me crazy. Here are two different classroom irritations which I find to be the most annoying plus some possible solutions to think about before school starts.

A. Getting a Drink; Using the Restroom

1)  Set the number of times each student may go per the week.

2)  Have a restroom pass so only one student is out of the classroom at a time.

3)  Count when the children are getting a drink at the drinking fountain such as 1-2-3.  This way everyone is given the same amount to time.
.
4)  Keep a bottle of hand sanitizer by the door so children may use it before lunch to clean their hands. (Unfortunately, not all children wash their hands after using the restroom.)

B. The Pencil Sharpener

1)   Have a box of pre-sharpened pencils that all the children may use.

2)   Make a designated time when students may sharpen pencils. If you have an electric pencil sharpener, unplug it during the off limits time.

3)   Designate an individual to be the “pencil sharpener.” This can be a daily job in your classroom. This person performs the task of sharpening pencils before school, after school, or during any other designated time.

4)   Have two cups of pencils near the pencil sharpener, one for dull pencils and one for sharpened pencils. When a child’s pencil is dull, s/he places it in the dull cup and takes one from the sharp cup.

$2.00
Do you want additional ideas on how to solve common classroom irritations plus more ideas for the ones mentioned above? Check out the complete resource that fully discusses:

           1)  Children Who Are Always at Your Desk
           2)  The Pencil Sharpener
           3)  Getting a Drink; Using the Restroom
           4)  Tattling
           5)  Stress – Especially at Test Time
           6)  Teasing
           7)  Unmotivated Students


Is Extra Credit a Worthwhile Option?

Among teachers, extra credit work has its supporters and its critics, and there are a large number of "undecideds" as well. (Sounds like a political poll!) The range of viewpoints is understandable because the whats, when, whys and hows of extra-credit assignments really matter. Many instructors can't determine whether extra credit is a benefit or a liability, whether it is a point of contention or a headache. In other words, often it is a controversial practice.

When considering extra credit, think about these questions.

1) Does extra credit urge the students to spend less effort on their main assignments?

2) Are extra credit assignments meaningful or mere busy work?

3) Will extra credit encourage student behaviors that will not serve them well in the real world?

4) Should extra credit opportunities be extended to every student or be offered only to certain students on a case-by-case basis?

5) Can extra credit work contribute to grade inflation?

Teaching on the college level, I find that particular instructors never offer extra credit under any circumstances. (That’s me!) Others embrace it as a way to help students learn the course material or improve an unacceptable test score. A small minority, if pushed, will confess they only offer it when students wear them down until they finally give in to it. Most instructors understand that if there are too many opportunities for extra credit, it could possibly outweigh the required course assignments to the point where a student could pass the class without meeting all the standards. (YIKES!!)

I have always been anti-extra credit, the central reason being that it can inflate grades and allow students to receive grades that truly do not reflect their abilities or understanding of a subject. (Remember, I teach math.)  This is the way I view it.
  • Extra credit reinforces students’ beliefs that they don’t need to work hard because whatever they miss or choose not to do, they can make up with extra credit. 
  • Often, students who ask for extra credit tend to be those who aren’t succeeding or those who hope they won’t have to work hard because some easy extra credit opportunities will be available to them. 
  • It is an unintended chance to make up for low scores on earlier exams or missed assignments. (I would NEVER create extra credit assignments at the end of a grading period for students who needed a boost in their grades.) 
  • Time spent on extra credit means less time spent on regular assignments. 
  • Extra credit (especially if it is easy) lowers academic standards for everyone in the class. 
  • It is basically unfair to students who work hard and get it done the first time or turned in when it is due. 
  • Extra credit means more work for me in that it has to be graded! 
So after all of my rambling about extra credit work, my question to you is:

"What are your thoughts (pros and cons) about extra credit?" 
Leave a comment to participate in the discussion.


Drill or Practice? They Are NOT the Same!


When I was a kid, one of the things I dreaded most was going to the dentist. Even though we were poor, my Mom took my brother and me every six months for a check-up.  Unfortunately, we didn’t have fluoridated water or toothpaste that enhanced our breath, made our teeth whiter, or prevented cavities.  I remember sitting in the waiting room hearing the drill buzzing, humming, and droning while the patient whined or moaned.  Needless to say, I did not find it a pleasant experience.

I am troubled that, as math teachers, we have carried over this idea of drill into the classroom. Math has become a “drill and kill” activity instead of a “drill and thrill” endeavor.  Because of timed tests or practicing math the same way over and over, many students whine and moan when it is math time.  So how can we get student to those “necessary” skills without continually resorting to monotonous drill?

First we must understand the difference between drill and practice.  In math drill refers to repetitive, non-problematic exercises which are designed to improve skills (memorizing basic math facts) or procedures the student already has acquired. It provides:

1)   Increased proficiency with one strategy to a predetermined level of mastery. To be important to learners, the skills built through drill must become the building blocks for more meaningful learning. Used in small doses, drill can be effective and valuable.

2)   A focus on a singular procedure executed the same way as opposed to understanding.  (i.e. lots of similar problems on many worksheets)  I have often wondered why some math teachers assign more than 15 homework problems.  For the student who understands the process, they only need 10-15 problems to demonstrate that.  For students who have no idea what they are doing, they get to practice incorrectly more than 15 times!

Unfortunately, drill also provides:


  3) A false appearance of understanding.  Because a student can add 50 problems in one minute does not mean s/he understands the idea of grouping sets.

 4) A rule orientated view of math.  There is only one way to work a problem, and the reason why is not important!  (Just invert and multiply but never ask the reason why.)

5)   A fear, avoidance, and a general dislike of mathematics. A constant use of math drills often leaves students uninterested.

On the other hand, practice is a series of different problem-based tasks or experiences, learned over numerous class periods, each addressing the same basic ideas. (ex. different ways to multiply)  It provides:

1)   Increased opportunity to develop concepts and make connections to other mathematical ideas.  (i.e. A fraction is a decimal is a percent is a ratio.)

2)   A focus on providing and developing alternative strategies.  My philosophy, which hangs in my classroom, is: “It is better to solve one problem five ways than to solve five problems the same way.”  (George Polya)

3)   A variety of ways to review a math concept.  (ex. games, crosswords, puzzles, group work)

4)   A chance for all students to understand math and to ask why. (Why do we invert and multiply when dividing fractions?) 

5)   An opportunity for all students to participate and explain how they arrived at the answer. Some may draw a picture, others may rely on a number line, or a few may use manipulatives. Good practice provides feedback to the students, and explains ways to get the correct answer.

Let’s look at it this way. A good baseball coach may have his players swing again and again in the batting cage. This drill will help, but by itself it will not make a strong baseball player whereas practicing hitting a ball with a pitcher requires reacting to the different pitches with thought, flexibility, and skill.
$4.50
I am of the opinion that drill should not be omitted from the math classroom altogether.  Basic math skills should be automatic because being fluent in the basics makes advanced math easier to grasp.  There is a place for drill; however, its use should be kept to situations where the teacher is certain that is the most appropriate form of instruction.  Even though practice is essential, for math it isn't enough. If understanding doesn't come, practice and drill will only leave a student with disjointed skills. If we want to produce strong mathematicians, we must focus on the BIG conceptual ideas through practice in problem-based lessons. We must present ideas in as many forms as we can so that students will go beyond rote drill to insight.

If you are interested in sharing this with your staff, colleagues or parents, check out the power point entitled: Drill vs. Practice

Yes or No? Stay or Go? Solving for "x" in a linear equation.


When my basic college algebra classes begin solving equations containing one unknown, I tell them, they are inquisitive detectives looking for the unknown. My students' greatest difficulty is deciding what stays and what goes in an equation. In other words, which term should be cleared by using the inverse operation and which term should stay where it is?

I  start by referring to the written equation as a teeter-totter or a see-saw which must always stay balanced. In other words, the equal sign is the pivotal point and both sides of that = sign must be the same.  We also discuss the importance of the"Whatsoever thou doest to one side of the equation, we must doest to the other". (Out of necessity, I admit that I was with Moses when he received the Ten Commandments, but it "fell upon me" to convey The First Commandment of Solving Equations to future mathematicians.)

One Unknown
We begin with very simple equations such as: x + 9 = 12. Here's the rub; a few of my students know the answer and do not want to show any of their work. Maybe some of you have this type of student as well. Since, after 40+ years, I am still unable to grade what is in their minds, I insist that all steps are written down. I explain that it's like riding a tricycle to ride a bicycle to ride a unicycle.

First, I instruct the students to look at the equation and determine which terms are out of place. (Side note: Because my students are easily confused, at the present, we keep all of the unknowns on the left side and all of the numbers on the right side of the equal sign.) Let's go back to our sample of x + 9 = 12. Because the x is already on the left side of the equation, the students write a "Y" over it for the word, "Yes". The 9 is on the wrong side of the equal sign, so the students write a "N" over it for "No".  Finally, they write a "Y" over the 12 since it is the correct place. They now have exactly what they want, a Y and N on the right side and a Y on the left side. They now must clear anything that has a "N" over it.  The students recognize they if they use the inverse operation of addition, they can clear the 9. They therefore subtract 9 from each side of the equation resulting in an answer of 3.

Many algebra teachers will have the students write the step x + 0 = 9.  You may wish to include this step in the process, but since my college students readily see that +9 and -9 make zero, they put an X over the two opposites to show that they cancel each other out or when added together, they equal zero.

What if the equation is: 3 = y - 4? This always freaks my students out; yet, if they do the yes/no process, they will discover that they have two "no's" and one "yes", not a yes, no = yes.  This means they can rewrite the equation as y - 4 = 3 to get a yes, no = yes. The problem can now easily be solved like the one above.

Unknown on both sides
of the equation
The next step is what to do when an unknown appears on both sides of the equal sign.   Usually, my students are sure they are incapable of solving such a difficult problem, but let's use the yes/no method and see what it looks like. 

Notice in the sample on the left that we have a yes, no = no, yes. We start by clearing the "N" on the left hand side of the equation by using the inverse of -9. We then go to the right side and clear the y by using the inverse operation of addition. (Yes, I am aware both can be cleared at the same time, but again simple and methodical is what is best for my mathphobics.) We then divide each side by 4 resulting in the answer of 3. When the problem is completed, my students are amazed and proud that they could solve such a long equation. (You might notice in the illustration, a dotted line is drawn vertically where the equal sign is. This helps my visual students to separate the two sides of the equation.)

If any of you try this approach with your students or have a different method, I would love to hear from you. Just leave a comment and a short statement of how this process worked for you or what process you use that is even better. That way, we can learn from each other.

I have made math tutorials for the college where I teach, and one of them goes through this process in detail. If you are interested and would like to hear me sing as well, go to:  Yes/No


I'm Pro-Tractor! Correctly teaching and using protractors

Using a protractor is supposed to make measuring angles easy, but somehow some students still get the wrong answer when they measure. Here are a few teacher tips that might help.

1)  Make sure that each student has the SAME protractor.  (To avoid having many sizes and types, I purchase a classroom set in the fall when they are on sale.)  If each student's protractor is the same, you can teach using the overhead or an Elmo, and everyone can follow along without someone raising their hand to declare that their protractor doesn't look like that!  (Since the protractor is clear it works perfectly on the overhead. No special overhead protractor is necessary.)

2) Show how the protractor represents 1/2 of a circle.  When two are placed together with the holes aligned, they actually form a circle.

3) Talk about the two scales on the protractor, how they are different, and where they are located.  It's important that the students realize that when measuring to start at zero degrees and not at the bottom of the tool.  They need to understand that the bottom is actually a ruler. 


I use a couple of word abbreviations to help my students remember which scale to use.

4)  When the base ray of an angle is pointing to the right, I tell the students to remember RB which stands for Right Below.  This means they will use the bottom scale to measure. 

5) When the base ray of an angle is pointing to the left, I tell the students to remember LT which are the beginning and ending letters of LefT. This means they will use the top scale to measure the angle.

6) Of course the protractor has to be on the correct side.  It's amazing how many students try to measure when the protractor is backwards.  All the information is in reverse!

7)  Make sure the students line up the hole with the vertex point of the angle, aligning the line on the protractor that extends from the hole, with the base ray.  Even if they choose the correct scale, if the protractor is misaligned, the answer will be wrong.

8)  Realize that the tools the students use are massed produced, and to expect students to measure to the nearest degree is impossible.  To purchase accurate tools such as engineer uses would cost more than any of us are willing to spend!

If you would like supplementary materials for angles, check out these two products: Angles: Hands On Activities  or  Geometry Vocabulary Crossword Puzzle.

Reducing Fractions with Pattern Sticks!


When working with fractions, many of my students seem confident in performing the different operations, but a few are still unsure of how to reduce fractions. 

Although I have stressed learning the Divisibility Rules for 2, 5, 10, and the digital root for 3, 6, 9,  some still have difficulty since they do not know their multiplication tables. As a mathematics tool, I have the students make Pattern Sticks, a visual and kinesthetic aid, similar to a multiplication chart like the one on the left. Notice that an extra column (blue) has been added to the chart. (In this space, a hole is punched so that a 1" ring can be inserted to store all of the sticks in one place.)

On the right are the directions for making the Pattern Sticks using a multiplication chart. 

(Side note: My students cut out individual Pattern Sticks which I prefer over cutting a multiplication chart apart.)

I then give the students fractions such as 9/36 to reduce. Using the Pattern Sticks, they search for a column where a 9 and a 36 are lined up in the same column. They easily find it on the 1 strip and the 4 strip. They then take the two strips and line them up so that the 9 is over the 36. (see illustration above) By moving to the left, they discover that 9/36 is the same as 1/4. This is 9/36 in its lowest terms. Also notice that all the fractions in the illustration are equivalent fractions - fractions that have the same value. The Pattern Sticks can also be used to determine what number to divide by and to change improper fractions to mixed numbers.
$3.00

If you are interested in learning more about Pattern Sticks and how to use them in your classroom, check out the resource entitled Pattern Sticks: A Math Tool for Skip Counting & Reducing Fractions at Teachers Pay Teachers.


From A Different Angle - Creating Angles using every day items

Here is a riddle for you.  What did the little acorn say when he grew up?  Give up?  It's Gee-I'm-A-Tree or Ge-om-e-try. This is what my students are beginning to study.  I absolutely love teaching this part of math, and it is interesting how the students respond. Those that are visual, love it, but usually, those who do better with the abstract aren't so fond of it.

I have a beautiful, talented daughter who loves languages.  She is fluent in Spanish and loves to write, write, and write.  To my chagrin, she always struggled in math, especially in high school, until she got to Geometry.  Her math grade changed from a disappointing (let's just say she passed Algebra) to an A.  She thought Geometry was wonderful!!

I enjoy teaching Geometry because there are so many concrete ways to show the students what you mean. For instance, when introducing angles, (before using protractors) I use my fingers, coffee filters (when ironed, they make a perfect circle), interlocking plastic plates, the clock, etc. to demonstrate what the various angles look like. Here is an example of what I mean.

To introduce right angle, I have the students fold a coffee filter (which is ironed flat) into fourths, and we use that angle to locate right angles all around the room.  We discuss the importance of a right angle in architecture, and what would happen if a right angle didn’t exist. 
We then use an analog clock to discover what time represents a right angle. Right away, they respond with 3:00 or 9:00. Some will say 3:30, but when I display 3:30 on a Judy clock (comes in handy even on the college level), they see that the hour hand is not directly on the three which means it is not a 90 degree angle.
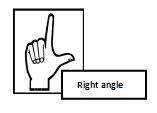
I also demonstrate a right angle by using my fingers.  What is great about fingers is that they are always with you.  I call the finger position you see on the right, Right on, Right angle.

$3.25
So are you ready for another geometry riddle?  (I have many!)  What is Orville and Wilbur's favorite angle? That’s right; it is a right (Wright) angle.

If you like geometry riddles, check out Geometry Parodies by clicking here. Also, if you are interested in many different concrete ways to teach angles, take a look at my product entitled: Angles: Geometry Hands-On Activities.


You Are An Important "Piece" of the Puzzle - using puzzles as ice breakers


I have quite a large family, 21 of us when we all get together. This past Christmas, my daughter insisted that I have name place cards so everyone would know where to sit. Since I thought this was a good idea, I went to the Dollar Tree and bought a 24 piece puzzle. I had my husband spray paint the pieces, and then, using a paint pen, I wrote each person's name on an individual piece. Since I had three pieces left over, I wrote "2017" on one, "Christmas" on another and drew a happy face on the third one. I then put a piece at each person's place at the table and explained that the theme for our dinner was "You are an important piece of our family."

When the 12 grandchildren finished eating Christmas dinner (they always finish first) they put the puzzle together. They were challenged but had fun doing it. They were also occupied while the adults finished eating.

This idea got me thinking about my college students. The first of the semester is always hard because they don't know me or one another, They are even unsure as where to sit. I got to thinking that this would be a great way to introduce my students to one another, and it would provide an interesting hands-on activity for the first day of class.

This might also be something that you could use at the beginning of the school year, but what happens if a student leaves or a new student is assigned to your room? If you paint both sides of the puzzle pieces, you can flip over the piece of the student who leaves and have a blank puzzle piece in its place. You can also leave blank ones to add new students. Don't forget, puzzles come in a variety of different sizes; so, if you have more than 24 students, it shouldn't be a problem. Just make sure the pieces themselves are large enough for the students to easily handle.


Put a LID on It! Using plastic lids as a teaching tool

There are so many things we consider to be trash, when in reality, they are perfect treasures for the classroom. One that I often use is plastic lids from things like peanut canisters, Pringles, coffee cans, margarine tubs, etc.  These lids can be made into stencils to use when completing a picture graph.

Students must first of all understand what a picture graph is.  A pictorial or picture graph uses pictures to represent numerical facts. Sometimes it is referred to as a representational graph. Each symbol or picture used on the graph represents a unit decided by the student or teacher. Each symbol could represent one, two, or whatever number you want.  This type of graph is used when the data being gathered is small or approximate figures are being used, and you want to make simple comparisons.

Here is what you do to make ready-made picture graph stencils.
  1. Choose the size of lid that you want and turn it over. Then trace a pattern on the plastic lid. Make sure you are using the bottom of the lid so the rim does not interfere when the children use it to trace. 
  2. To make the stencil, cut out the pattern using an Exacto knife. You might choose to do zoo animals: a zebra, a lion, a bear, an elephant or a giraffe. 
  3. Have a large sheet of paper ready with a question on it such as: “What is your favorite zoo animal?” 
  4. The students then select the stencil (picture) that is their favorite animal and trace it in the correct row on the graph. 
Below is a sample of this type of graph. It is entitled, What is Your Favorite Season? A leaf is used for fall; a snowflake represents winter; a flower denotes spring, and the sun is for summer. Notice at the bottom of the graph that each tracing will represent one student.
You could craft stencils for modes of transportation, geometric shapes, pets, weather, etc. The list is infinite. But what if you don't want to or don't have time to make all of those stencils? Then save the strips that are left when you punch out shapes using a die press. They are instant stencils!

If you are interested in additional graphing ideas, check out the resource entitled: Graphing Without Paper or Pencil. You might also like Milk Lid Math. This four page handout contains numerous math activities that utilize a free manipulative.
 

The Pros and Cons of Testing

Tests are here to stay whether we like it or not. As I read various blogs, I am finding more and more teachers who are frustrated over tests and their implications. I am seeing many of my former student teachers leave the teaching profession after only two or three years because of days structured around testing.

High stakes tests have become the “Big Brother” of education, always there watching, waiting, and demanding our time. As preparing for tests, taking pre-tests, reliably filling in bubbles, and then taking the actual assessments skulk into our classroom, something else of value is replaced since there are only so many hours in a day. In my opinion, tests are replacing high quality teaching and much needed programs such as music and art. I have mulled this over for the last few months, and the result is a list of pros and cons regarding tests.

Testing Pros

  1. They help teachers understand what students have learned and what they need to learn.
  2. They give teachers information to use in planning instruction. 
  3. Tests help schools evaluate the effectiveness of their programs. 
  4. They help districts see how their students perform in relation to other students who take the same test. 
  5. The results help administrators and teachers make decisions regarding the curriculum. 
  6. Tests help parents/guardians monitor and understand their child's progress. 
  7. They can help in diagnosing a student's strengths and weaknesses. 
  8. They keep the testing companies in business and the test writers extremely busy. 
  9. Tests give armchair educators and politicians fodder for making laws on something they know little about.  
                                           **The last two are on the sarcastic side.**

Testing Cons
  1. They sort and label very young students, and those labels are nearly impossible to change.
  2. Some tests are biased which, of course, skew the data. 
  3. They are used to assess teachers in inappropriate ways. (high scores = pay incentives?) 
  4. They are used to rank schools and communities. (Those rankings help real estate agents, but it is unclear how they assist teachers or students.) 
  5. They may be regarded as high stakes for teachers and schools, but many parents and students are indifferent or apathetic. 
  6. They dictate or drive the curriculum without regard to the individual children we teach. 
  7. Often, raising the test scores becomes the single most important indicator of overall school improvement. 
  8. Due to the changing landscape of the testing environment, money needed for teachers and the classroom often goes to purchasing updated testing materials. 
  9. Under Federal direction, national testing standards usurp the authority of the state and local school boards. 
  10. Often they are not aligned with the curriculum a district is using; so, curriculum is often changed or narrowed to match the tests. 
Questions That Need to Be Asked
  1. What is the purpose of the test?
  2. How will the results be communicated and used by the district? 
  3. Is the test a reflection of the curriculum that is taught? 
  4. Will the results help teachers be better teachers and give students ways to be better learners?
  5. Does it measure both a student's understanding of concepts as well as the process of getting the answer? 
  6. Is it principally made up of multiple choice questions or does it does it contain any performance based assessment? 
  7. What other means of evaluation does the school use to measure a child's progress? 
  8. Is it worth the time and money?