menu   Home Answers Math Games Free Resources Contact Me  

I'm Pro-Tractor! Correctly teaching and using protractors

Using a protractor is supposed to make measuring angles easy, but somehow some students still get the wrong answer when they measure. Here are a few teacher tips that might help.

1)  Make sure that each student has the SAME protractor.  (To avoid having many sizes and types, I purchase a classroom set in the fall when they are on sale.)  If each student's protractor is the same, you can teach using the overhead or an Elmo, and everyone can follow along without someone raising their hand to declare that their protractor doesn't look like that!  (Since the protractor is clear it works perfectly on the overhead. No special overhead protractor is necessary.)

2) Show how the protractor represents 1/2 of a circle.  When two are placed together with the holes aligned, they actually form a circle.

3) Talk about the two scales on the protractor, how they are different, and where they are located.  It's important that the students realize that when measuring to start at zero degrees and not at the bottom of the tool.  They need to understand that the bottom is actually a ruler. 


I use a couple of word abbreviations to help my students remember which scale to use.

4)  When the base ray of an angle is pointing to the right, I tell the students to remember RB which stands for Right Below.  This means they will use the bottom scale to measure. 

5) When the base ray of an angle is pointing to the left, I tell the students to remember LT which are the beginning and ending letters of LefT. This means they will use the top scale to measure the angle.

6) Of course the protractor has to be on the correct side.  It's amazing how many students try to measure when the protractor is backwards.  All the information is in reverse!

7)  Make sure the students line up the hole with the vertex point of the angle, aligning the line on the protractor that extends from the hole, with the base ray.  Even if they choose the correct scale, if the protractor is misaligned, the answer will be wrong.

8)  Realize that the tools the students use are massed produced, and to expect students to measure to the nearest degree is impossible.  To purchase accurate tools such as engineer uses would cost more than any of us are willing to spend!

If you would like supplementary materials for angles, check out these two products: Angles: Hands On Activities  or  Geometry Vocabulary Crossword Puzzle.

Reducing Fractions with Pattern Sticks!


When working with fractions, many of my students seem confident in performing the different operations, but a few are still unsure of how to reduce fractions. 

Although I have stressed learning the Divisibility Rules for 2, 5, 10, and the digital root for 3, 6, 9,  some still have difficulty since they do not know their multiplication tables. As a mathematics tool, I have the students make Pattern Sticks, a visual and kinesthetic aid, similar to a multiplication chart like the one on the left. Notice that an extra column (blue) has been added to the chart. (In this space, a hole is punched so that a 1" ring can be inserted to store all of the sticks in one place.)

On the right are the directions for making the Pattern Sticks using a multiplication chart. 

(Side note: My students cut out individual Pattern Sticks which I prefer over cutting a multiplication chart apart.)

I then give the students fractions such as 9/36 to reduce. Using the Pattern Sticks, they search for a column where a 9 and a 36 are lined up in the same column. They easily find it on the 1 strip and the 4 strip. They then take the two strips and line them up so that the 9 is over the 36. (see illustration above) By moving to the left, they discover that 9/36 is the same as 1/4. This is 9/36 in its lowest terms. Also notice that all the fractions in the illustration are equivalent fractions - fractions that have the same value. The Pattern Sticks can also be used to determine what number to divide by and to change improper fractions to mixed numbers.
$3.00

If you are interested in learning more about Pattern Sticks and how to use them in your classroom, check out the resource entitled Pattern Sticks: A Math Tool for Skip Counting & Reducing Fractions at Teachers Pay Teachers.


From A Different Angle - Creating Angles using every day items

Here is a riddle for you.  What did the little acorn say when he grew up?  Give up?  It's Gee-I'm-A-Tree or Ge-om-e-try. This is what my students are beginning to study.  I absolutely love teaching this part of math, and it is interesting how the students respond. Those that are visual, love it, but usually, those who do better with the abstract aren't so fond of it.

I have a beautiful, talented daughter who loves languages.  She is fluent in Spanish and loves to write, write, and write.  To my chagrin, she always struggled in math, especially in high school, until she got to Geometry.  Her math grade changed from a disappointing (let's just say she passed Algebra) to an A.  She thought Geometry was wonderful!!

I enjoy teaching Geometry because there are so many concrete ways to show the students what you mean. For instance, when introducing angles, (before using protractors) I use my fingers, coffee filters (when ironed, they make a perfect circle), interlocking plastic plates, the clock, etc. to demonstrate what the various angles look like. Here is an example of what I mean.

To introduce right angle, I have the students fold a coffee filter (which is ironed flat) into fourths, and we use that angle to locate right angles all around the room.  We discuss the importance of a right angle in architecture, and what would happen if a right angle didn’t exist. 
We then use an analog clock to discover what time represents a right angle. Right away, they respond with 3:00 or 9:00. Some will say 3:30, but when I display 3:30 on a Judy clock (comes in handy even on the college level), they see that the hour hand is not directly on the three which means it is not a 90 degree angle.
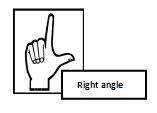
I also demonstrate a right angle by using my fingers.  What is great about fingers is that they are always with you.  I call the finger position you see on the right, Right on, Right angle.

$3.25
So are you ready for another geometry riddle?  (I have many!)  What is Orville and Wilbur's favorite angle? That’s right; it is a right (Wright) angle.

If you like geometry riddles, check out Geometry Parodies by clicking here. Also, if you are interested in many different concrete ways to teach angles, take a look at my product entitled: Angles: Geometry Hands-On Activities.