menu   Home Answers Math Games Free Resources Contact Me  

Reducing Fractions with Pattern Sticks!


When working with fractions, many of my students seem confident in performing the different operations, but a few are still unsure of how to reduce fractions. 

Although I have stressed learning the Divisibility Rules for 2, 5, 10, and the digital root for 3, 6, 9,  some still have difficulty since they do not know their multiplication tables. As a mathematics tool, I have the students make Pattern Sticks, a visual and kinesthetic aid, similar to a multiplication chart like the one on the left. Notice that an extra column (blue) has been added to the chart. (In this space, a hole is punched so that a 1" ring can be inserted to store all of the sticks in one place.)

On the right are the directions for making the Pattern Sticks using a multiplication chart. 

(Side note: My students cut out individual Pattern Sticks which I prefer over cutting a multiplication chart apart.)

I then give the students fractions such as 9/36 to reduce. Using the Pattern Sticks, they search for a column where a 9 and a 36 are lined up in the same column. They easily find it on the 1 strip and the 4 strip. They then take the two strips and line them up so that the 9 is over the 36. (see illustration above) By moving to the left, they discover that 9/36 is the same as 1/4. This is 9/36 in its lowest terms. Also notice that all the fractions in the illustration are equivalent fractions - fractions that have the same value. The Pattern Sticks can also be used to determine what number to divide by and to change improper fractions to mixed numbers.
$3.00

If you are interested in learning more about Pattern Sticks and how to use them in your classroom, check out the resource entitled Pattern Sticks: A Math Tool for Skip Counting & Reducing Fractions at Teachers Pay Teachers.


From A Different Angle - Creating Angles using every day items

Here is a riddle for you.  What did the little acorn say when he grew up?  Give up?  It's Gee-I'm-A-Tree or Ge-om-e-try. This is what my students are beginning to study.  I absolutely love teaching this part of math, and it is interesting how the students respond. Those that are visual, love it, but usually, those who do better with the abstract aren't so fond of it.

I have a beautiful, talented daughter who loves languages.  She is fluent in Spanish and loves to write, write, and write.  To my chagrin, she always struggled in math, especially in high school, until she got to Geometry.  Her math grade changed from a disappointing (let's just say she passed Algebra) to an A.  She thought Geometry was wonderful!!

I enjoy teaching Geometry because there are so many concrete ways to show the students what you mean. For instance, when introducing angles, (before using protractors) I use my fingers, coffee filters (when ironed, they make a perfect circle), interlocking plastic plates, the clock, etc. to demonstrate what the various angles look like. Here is an example of what I mean.

To introduce right angle, I have the students fold a coffee filter (which is ironed flat) into fourths, and we use that angle to locate right angles all around the room.  We discuss the importance of a right angle in architecture, and what would happen if a right angle didn’t exist. 
We then use an analog clock to discover what time represents a right angle. Right away, they respond with 3:00 or 9:00. Some will say 3:30, but when I display 3:30 on a Judy clock (comes in handy even on the college level), they see that the hour hand is not directly on the three which means it is not a 90 degree angle.
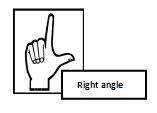
I also demonstrate a right angle by using my fingers.  What is great about fingers is that they are always with you.  I call the finger position you see on the right, Right on, Right angle.

$3.25
So are you ready for another geometry riddle?  (I have many!)  What is Orville and Wilbur's favorite angle? That’s right; it is a right (Wright) angle.

If you like geometry riddles, check out Geometry Parodies by clicking here. Also, if you are interested in many different concrete ways to teach angles, take a look at my product entitled: Angles: Geometry Hands-On Activities.


You Are An Important "Piece" of the Puzzle - using puzzles as ice breakers


I have quite a large family, 21 of us when we all get together. This past Christmas, my daughter insisted that I have name place cards so everyone would know where to sit. Since I thought this was a good idea, I went to the Dollar Tree and bought a 24 piece puzzle. I had my husband spray paint the pieces, and then, using a paint pen, I wrote each person's name on an individual piece. Since I had three pieces left over, I wrote "2017" on one, "Christmas" on another and drew a happy face on the third one. I then put a piece at each person's place at the table and explained that the theme for our dinner was "You are an important piece of our family."

When the 12 grandchildren finished eating Christmas dinner (they always finish first) they put the puzzle together. They were challenged but had fun doing it. They were also occupied while the adults finished eating.

This idea got me thinking about my college students. The first of the semester is always hard because they don't know me or one another, They are even unsure as where to sit. I got to thinking that this would be a great way to introduce my students to one another, and it would provide an interesting hands-on activity for the first day of class.

This might also be something that you could use at the beginning of the school year, but what happens if a student leaves or a new student is assigned to your room? If you paint both sides of the puzzle pieces, you can flip over the piece of the student who leaves and have a blank puzzle piece in its place. You can also leave blank ones to add new students. Don't forget, puzzles come in a variety of different sizes; so, if you have more than 24 students, it shouldn't be a problem. Just make sure the pieces themselves are large enough for the students to easily handle.


Put a LID on It! Using plastic lids as a teaching tool

There are so many things we consider to be trash, when in reality, they are perfect treasures for the classroom. One that I often use is plastic lids from things like peanut canisters, Pringles, coffee cans, margarine tubs, etc.  These lids can be made into stencils to use when completing a picture graph.

Students must first of all understand what a picture graph is.  A pictorial or picture graph uses pictures to represent numerical facts. Sometimes it is referred to as a representational graph. Each symbol or picture used on the graph represents a unit decided by the student or teacher. Each symbol could represent one, two, or whatever number you want.  This type of graph is used when the data being gathered is small or approximate figures are being used, and you want to make simple comparisons.

Here is what you do to make ready-made picture graph stencils.
  1. Choose the size of lid that you want and turn it over. Then trace a pattern on the plastic lid. Make sure you are using the bottom of the lid so the rim does not interfere when the children use it to trace. 
  2. To make the stencil, cut out the pattern using an Exacto knife. You might choose to do zoo animals: a zebra, a lion, a bear, an elephant or a giraffe. 
  3. Have a large sheet of paper ready with a question on it such as: “What is your favorite zoo animal?” 
  4. The students then select the stencil (picture) that is their favorite animal and trace it in the correct row on the graph. 
Below is a sample of this type of graph. It is entitled, What is Your Favorite Season? A leaf is used for fall; a snowflake represents winter; a flower denotes spring, and the sun is for summer. Notice at the bottom of the graph that each tracing will represent one student.
You could craft stencils for modes of transportation, geometric shapes, pets, weather, etc. The list is infinite. But what if you don't want to or don't have time to make all of those stencils? Then save the strips that are left when you punch out shapes using a die press. They are instant stencils!

If you are interested in additional graphing ideas, check out the resource entitled: Graphing Without Paper or Pencil. You might also like Milk Lid Math. This four page handout contains numerous math activities that utilize a free manipulative.